Many assume Roughness and Bump are the same thing but did you know they are two completely different material properties? We often rely solely on bump textures to enhance our materials in KeyShot but the same texture maps you’ve been using for Bump can also be used for Roughness! Let’s take a look at the difference between roughness and bump, to better understand how they can be used to enhance the detail and realism of your renderings in KeyShot.
What Roughness Is Not
In the CG (computer graphics) world, a bump texture is a grayscale image that simulates peaks and valleys on the surface of geometry. The peaks catch light and cast shadows while the valleys recede and reflect very little light. The result of using bump textures is an appearance that the detail was modeled into the geometry. Rather than modeling a highly intricate texture such as leather or wood grain, we rely on texture maps in KeyShot to add realism to our renderings without having to painstakingly model every intricate detail.
In CG, a bump texture is what drives the simulation of varying height of a surface. Roughness is not a bump texture.

Adding roughness will not result in the texture you see on the keys in the image above.
What Roughness Is
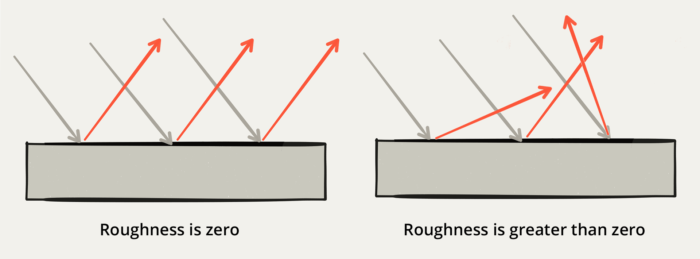
In CG, Roughness describes how light behaves when it comes in contact with a surface. Roughness can be thought of as how matte or glossy a surface appears.

From left to right, the above spheres have a roughness of 0-90%.
How Roughness Works
When roughness is set to zero, light simply bounces off that material at an inverse angle (like a mirror). When roughness is increased, light that reflects off that material scatters at varying angles, resulting in a more satin or matte finish.
Setting Roughness in KeyShot
By increasing roughness, a surface will become less glossy and more matte. The same amount of light is being reflected from the surface, but adding roughness diffuses that light across the surface. A surface with little or no roughness concentrates the reflected light, giving us sharp reflections and highlights on a surface.
Roughness Textures
KeyShot allows you to take roughness a step further by using texture maps to define roughness. Black values represent a roughness value of zero (glossy), and white values represent roughness value of 1 (matte). Grayscale values will be respected, such as 50% gray resulting in .5 roughness. Using roughness textures in KeyShot can save you from separating surfaces that will have more of a glossy or matte finish on your products. To increase realism, roughness textures can be applied to add minor surface defects or grime such as skin oils, light abrasions or even dust.

The above image was used to produce the results in Fig. A above.
Using roughness textures in KeyShot can save you from separating surfaces that will have more of a glossy or matte finish on your products. To increase realism, roughness textures can be applied to add minor surface defects or grime such as skin oils, light abrasions or even dust.
Applying Roughness Textures In KeyShot
Any time there is a small checkered icon to the left of a material parameter’s input field in KeyShot, it means that parameter can be controlled by a texture map.

The above rendering was made with an image applied to the glass material as a roughness texture in KeyShot.
Three ways to apply a roughness texture within KeyShot
- Drag a texture onto the checkered icon
- Double-click or right-click on the checkered icon and browse for a texture map or procedural texture
- Drag your texture into the material graph window and drag the texture’s output node onto the node of the material you wish to apply it to
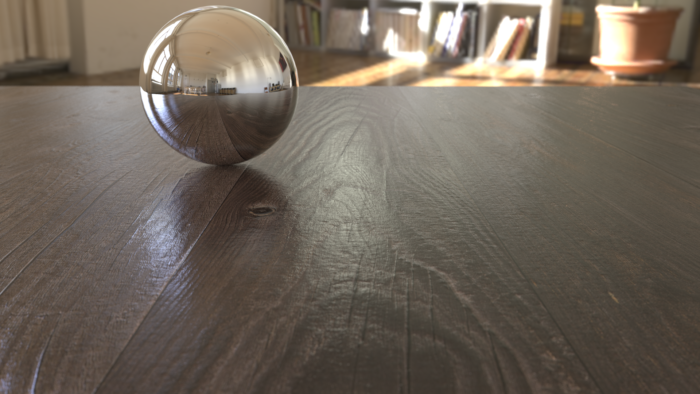
The above rendering was made by adding a bump texture, diffuse texture and roughness texture to a flat, smooth plane to create a convincing wood surface.
Materials With Mappable Roughness
- Glass (solid)
- Metal
- Paint
- Plastic
- Translucent
- Advanced
- Anisotropic
- Dielectric
- Gem
- Metallic Paint
- Plastic Transparent
- Translucent Advanced
- Ground
- Toon
- Wireframe


