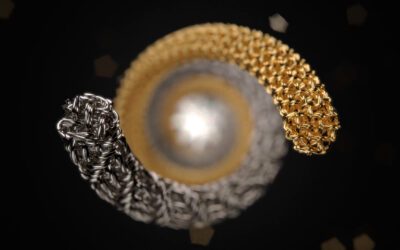
Have you ever seen a rendering of water that looks so realistic your eyeballs start feeeling moist? It could be the tears of joy from seeing something so beautiful rendered in KeyShot (and it likely is) but it may also be from the desire you have to create a photo-realistic 3d rendering of water yourself. It’s easily done in KeyShot with the scientifically accurate water material. Did I mention is was scientifically accurate… indeed I did. Applying the liquid bump map is just as easy. Here, KeyShot user Christian D’alberto shows us the process he went through to achieve the watery composition with floating sphere you see above. First though, here’s the video of Chris’ process.
Did you get all that? Yep, a little fast, so we’ll take you though it step-by-step, or rather Chris will take you through it step-by-step.
Note: The first two steps take you through the process of creating a bump map using After Effects and Photoshop. If you don’t have either, you can download Chris’ maps here or snag some other Water bump maps here. Step 3 takes you through creating a model in Maya. You can of course create a model in any of the supported formats (SolidWorks, Rhino, Creo, Pro/E, SketchUp, Inventor, etc.) and import directly into KeyShot to apply the water texture to.
How to Render Water in KeyShot

Step 1 – Creating the Water Bump map in After Effects
- Start After effects, Create a Composition with Aspect Ratio 2048 x 2048 and name it Noise.
- Create a solid with the same aspect ratio.
- Apply the fractal noise from the effect menu to the solid.
- Under the effect Controls tab change the fractal type to Dynamic twist, set the Noise type to spline, check the invert box, adjust contrast to 55 and brightness to -7 and the complexity 12.

- As we only need a frame of our composition, select Composition, Save Frame As…

- Set where you want to save your file and Press Render.
Step 2 – Tiling and Blurring the displacement map in Photoshop
- Open the Noise file in Photoshop.
- Under the filter menu apply the Offset effect.
- Set the Horizontal to + 973 and Vertical to + 690.
- Using the clone tool, clone out any seams that you see.

- Select the layer and apply the Gaussian blur filter with Radius 5.

- Save the file as a jpeg image, we will come back to it later!
Step 3 – Creating a scene in Maya
- Open Maya
- Create a plane, name it water and set the Subdivision Width and Height to 20.
- Duplicate this plane, change the name to reflection and move it below the water plane.
- Create a Camera – Place it at the edge of the water and face it toward the horizon line.

- Change the viewport from perceptive to camera 1 , select all geometry and scale them in x to fill in the gap on the sides.

- Create a poly sphere and place it above the water.

- Select the camera, navigate to the Attribute Editor and change the Film aspect ratio to 1.78.
- Before leaving Maya, we need to make sure that every object in the scene has a different material. Under the hypershade create three different lamberts and assign one per object.
- To export the scene select all geo and camera from the outliner and export them using the FXB format.
Step 4 – Rendering the model in KeyShot
- Open Keyshot
- Import the FBX from Maya
- Using the material Editor, Drag and drop the water material from the liquid group on top of the plane.

- Next, Drag the Brick material from the architecture group and Drop it on the bottom plane.
- Right click on the bottom plane to bring up the options for the Brick material. Uncheck the fresnel option.
- Assign a chrome material to the sphere and bring down the brightness of the diffuse Color.
- Under the option tab (Projects, Camera tab in KeyShot 3), change the view from active to camera 1. This should load the camera that we brought from Maya.

- Load the HDRI using the environment tab. The one I used comes with keyshot and is called “hdri-locations_iceland_4k_hdz”
- Under the environment option make the following changes:
- Height -0400
- Size 8.5850
- Rotation 21.180
- Load the bump map you created earlier in the bump channel of the water material.
- Change Scale U and V to 0.180.

- Under the Camera option turn on depth of field and use the pick focus to define the focal distance of the sphere.

- Last step, Press Render in the main viewport and your done!


0 Comments