Network Rendering is an incredible way to improve your workflow. It allows you to increase your rendering speed and capacity by utilizing multiple computers on one network. All of that hardware combined equals faster output. Plus, sending everything to the network, rather than rendering locally, frees up your computer, enabling you to continue refining your design, adding variations, and submitting additional jobs. Let’s quickly run though the basics of KeyShot Network Rendering.
KeyShot Network Rendering Software
First, you’ll want to note that the KeyShot Network Rendering software is compatible with Windows, Mac, and Linux. Visit the KeyShot Downloads page for the individual installer for your OS. Along with all the benefits listed above, using a network for your renders allows you to use the combined power of all available resources or build a more powerful rendering network over time. The following explains the KeyShot Network Rendering roles and the process you will use to submit renderings to your network.
1. Network Rendering Roles
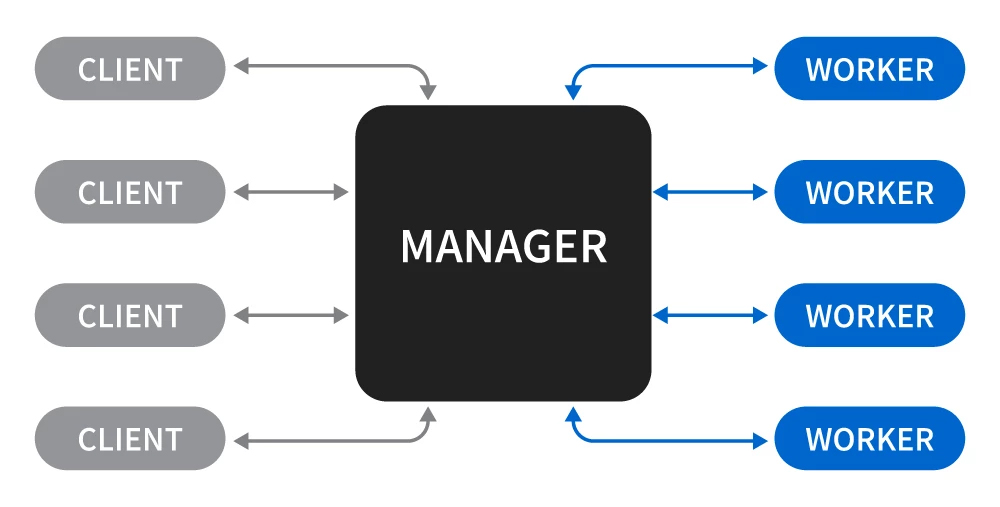
Network Rendering consists of three roles. The Clients, the Manager, and the Workers. The KeyShot Client application communicates internally with the Manager service and assigns the job tasks to the available Workers. The Workers are the machines you’ve added to your network. You can have both CPU and GPU Workers, but be aware that adding slower machines can sometimes increase total render times, due to increased load balancing and network latency.

2. Sending A Job to Your Network
To send a job directly to your network, navigate to Options in the Render Dialog. Make sure to switch Render Mode to Send to Network then choose the desired mode from the Render Engine drop down. If you have multiple CPUs or GPUs assigned as Workers, this is where you would make the initial request for the network to use the CPU or GPU for your jobs. After applying these settings, any future jobs will be sent to the network. The Render button in the render dialog now reads Send to Network.
3. Send Queued Jobs to Your Network
In the Render dialogue, click Queue. If you’ve built up a queue and want to render on the network, you can select all jobs and choose Send to Network. This will free up your machine and push the jobs to your network. Note: clicking Process Queue will still render all jobs locally on your machine, so be sure to click Send to Network.
4. Watch Progress in the Network Monitor
Once you send jobs to the network, the KeyShot Network Monitor will launch automatically. You can watch the progress of jobs here and see which Workers are currently completing tasks. The progress bar will estimate the time remaining, however, it is based on an extrapolation of what has already been rendered. For example, if the remaining animation frames to be rendered are more complex than the initial frames, it may seem like the progress bar slows down as it reaches the more complex sections of the animation.
5. View Completed Jobs
Within the Completed list of the Network Monitor, you can view jobs that are finished, check out their details, a preview, and a log of events related to the job. To quickly view your finished rendering in the saved folder, just click the folder icon next to the name of your rendering.
As you can imagine, using the power of your network to rendering visuals can save time and free up your own computer’s resources. Expand your rendering capabilities with KeyShot Network Rendering, available for purchase in the KeyShot store. For more details about KeyShot Network Rendering, visit the KeyShot Network Rendering manual.
What Can You Create?
We would love to see what you create with this tip. Visit the KeyShot Amazing Shots forum to see what others are creating and share your own work. And if you have a suggestion for another tip share it in the comments below.


0 Comments