
An important feature and visual cue for many real-world products is light. Effectively demonstrating a product’s functionality by flashing, blinking, or gently pulsing an LED is important. Here, we’ll use the Color Fade Animation available in the Material Graph with KeyShot Pro to achieve a subtle pulsing LED animation.
Pulsing LEDs Using the Color Fade Animation Node
In this example, we'll use a model of an electric toothbrush docking into its charger. This small light on the side will be our source. The goal is to make this light slowly fade in and out once the toothbrush lands in the charger.
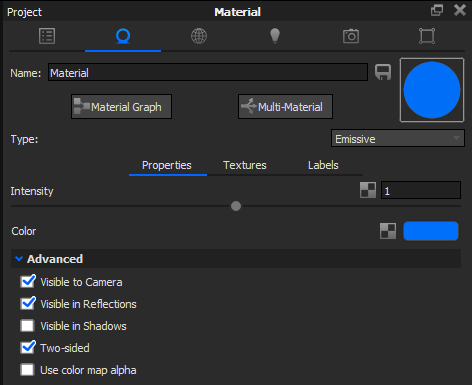
To achieve this, we'll use an Emissive Material Type. This is the perfect material for small light sources like this since it’s not meant to illuminate an entire scene. Drag and drop an emissive material onto your part from the KeyShot material library or double-click the part and select Emissive from the Material Type dropdown menu. To really see the effects of this material, make sure you have Global Illumination checked in the Lighting tab. Let's start.
1. Adjusting Emissive Intensity and Color
Okay, look at the properties of the emissive material - there's not much to it, right? We’re going to focus on that Intensity slider. This controls the intensity of the light emitted. For instance, with a value of 0 the light will appear off but, bump it up to 3 and it’s nice and bright. Here you can change the color of this material, but for this demo, I’m sticking with white.
2. Add a Color Fade Node
Next, let’s open the Material Graph. This is where we have the ability to add and connect nodes to create really advanced materials. To animate this light, right-click in the Material Graph, and select Color Fade from the Animation section. Click the output on the Color Fade node and drag it to the Emissive node, selecting Intensity since, as we learned just a bit ago, that’s how we’ll control and animate the brightness.
3. Open the Animation Timeline
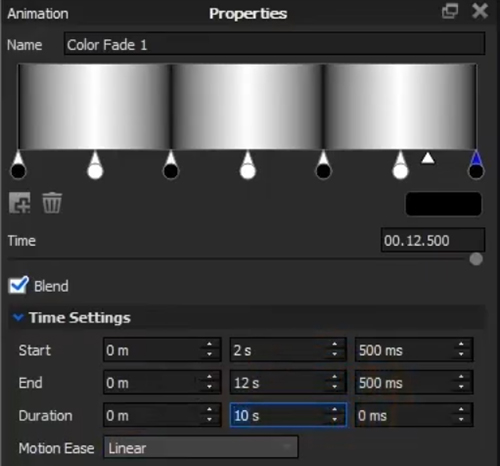
Close the Material Graph and hit the 'A-key' to show the Animation Timeline. Selecting the Color Fade animation, you’ll see a black and white gradient bar in the Animation Properties. This is responsible for, essentially, turning the light on and off. Think of black as a value of 0 (off) and white as a value of 1 (on). By default, it goes from 1 to 0 (on to off).
4. Modify the Color Fade Properties
Now, here's the trick. By adding more stops to the gradient bar and alternating the black and white values, we will create a blinking effect. Click the Add Stop icon to add several stops and alternate their colors accordingly. You can create a Color Swatch to speed this up a bit. For the transition between the off and on state, be sure to space the stops evenly or as needed for your application. Here are the final Color Fade settings for the toothbrush LED example that gradually goes from off, to on, to off, three times every two seconds.
5. Make Your Final Adjustments
If the light pulse feels a little fast, simply increase the animation duration in the Animation Timeline. If the light doesn't seem bright enough or it's too bright, go back into the Material Graph and adjust your Intensity or add a Color to Number Utility node to increase and fine-tune the values of the light. Lastly, to add a little glow around the light, go to the Image tab and turn on the Bloom effect.
There you go! A very simple and very easy way to create a pulsing light using the Color Fade node.
What Can You Create?
We would love to see what you create with this tip. Visit the KeyShot Amazing Shots forum to see what others are creating and share your own work. And if you have a suggestion for another tip share it in the comments below.
Animate Your Models in KeyShot Pro
Interested in animating your models with KeyShot Pro? Download and start rendering today.
Want to try it first?


