

")
Rendering liquids in glass can be challenging, but with KeyShot's support for nested dielectrics it couldn't be more simple.
So, what are nested dielectrics? And what works best when setting up the model or adjusting the render settings? Let's answer these and look at what you need to consider to achieve the best results when rendering liquid in glass.
What are Nested Dielectrics?
A dielectric is a solid, liquid or gas that is generally a poor conductor of electricity. These would include materials like ceramic, glass, plastic, paper, distilled water. When light enters the material it slows down and multiple, or nested, dielectrics with a varying index of refraction can complicate things. KeyShot’s support for nested dielectrics allows dielectric bodies to overlap and automatically prioritize and calculate the interface between these materials. See the manual for more information on the settings that affect Dielectric material types.
In the past, KeyShot relied on defining boundary surfaces between liquid and glass material (and other dielectrics). KeyShot 8 allows you to skip the steps of separating and defining these boundary surfaces in the 3D modeling software. The nested dielectrics workflow means you can model a solid for your liquid and a solid for the glass and treat them each as the material they are intended to be.

One Important Detail: Overlapping Surfaces
There’s one little step we need to follow to ensure that our liquids in glass looks correct. We need to make sure the volume of the liquid extends beyond the inner surface of the glass by a small amount. Why? Remember in our explanation of nested dielectrics above? This allows the interface between the materials to be correctly calculated.
So, co-planar surfaces need to be avoided. Co-planar is when two surfaces occupy the same place, which is physically impossible and will give you inaccurate result. As stated, if your liquid surface overlaps just a small amount into the glass solid, the appearance will be accurate.
Best practices suggest that you model the liquid in your 3D modeling software so it overlaps the container just a little bit. However, in a pinch, you can select the liquid and use the Scale option in KeyShot to increase the size slightly. These options are found in the Position tab under the Project window Scene Tree when an object is selected.
Adjust Your Settings
When working with transparent materials and glass, make sure the Ray Bounce value is high enough. You’ll need one ray bounce for every transparent surface the light needs to pass through, plus one more to see what is behind the transparent material. Often times, the Product Lighting Presets option, under the Project window, Lighting tab, is sufficient. You can download an example model and KeyShot scene file below.
If you have an earlier version of KeyShot, try or upgrade today! This is just one of the many time-saving improvements later viersions offers. That said, if you need to render liquid in glass in earlier versions of KeyShot, follow the method outlined below.
Rendering Liquid in KeyShot 7 and Earlier
For KeyShot 7 and earlier, it's still simple to render liquid in glass, but you need to construct the 3D model slightly different. While you're able to use solid geometry in KeyShot 8, you'll want to use multiple surfaces with no air gap in KeyShot 7 to eliminate incorrectly calculated liquid-glass interaction.
To get the best results in KeyShot 7 and earlier, break your model into three main surfaces:
Glass surface: Outer shell, or where only glass is visible
Liquid / Glass surface: Single surface where glass and liquid would touch
Liquid / Air surface: Single surface where glass meets air, adding a meniscus is nice bonus
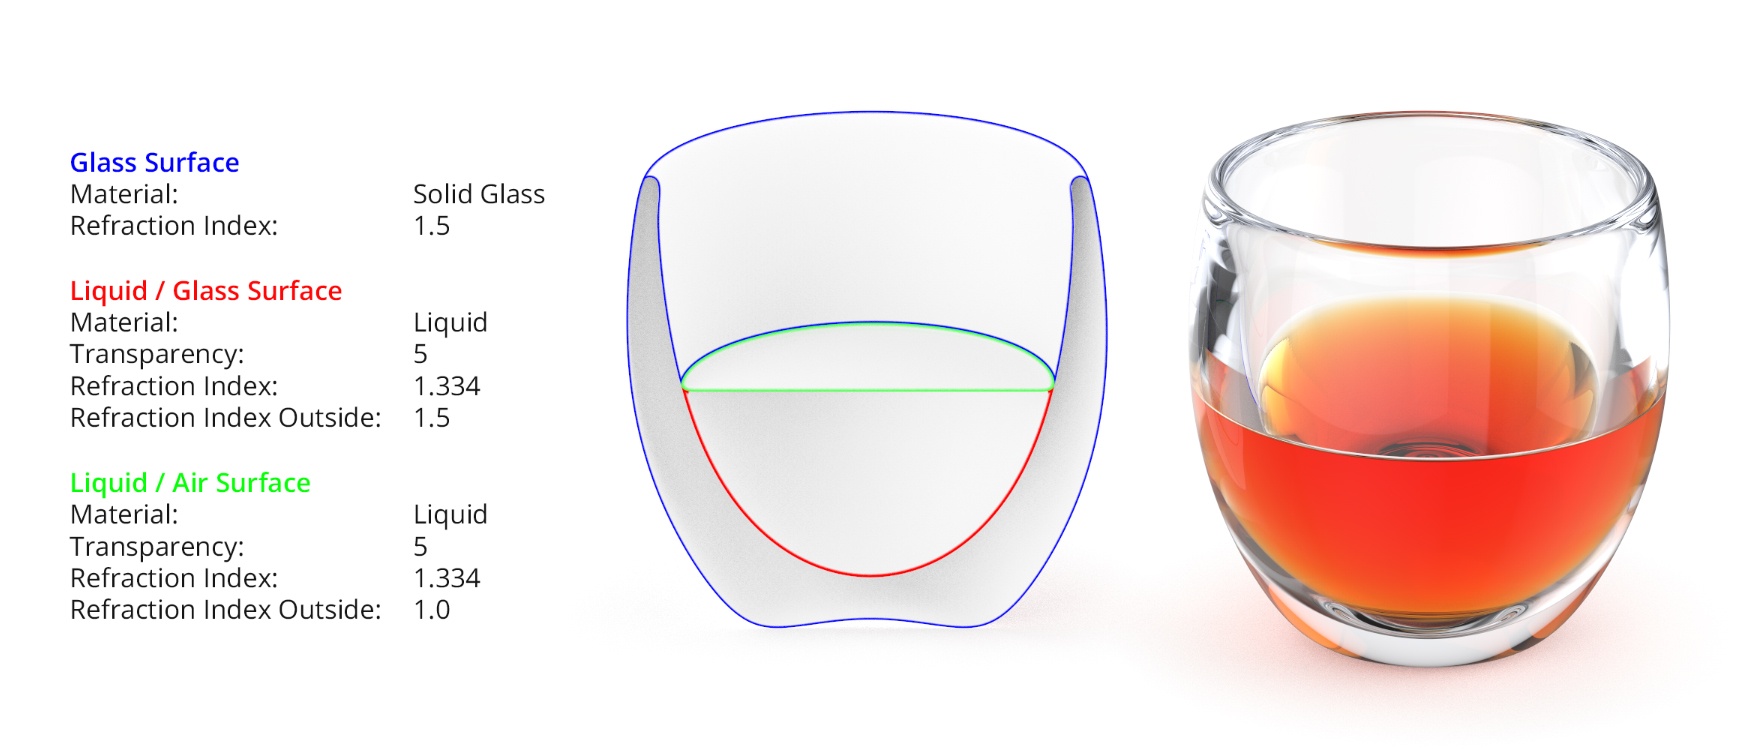
You can then assign more advanced materials such as Glass (Solid) and Liquid to your surfaces, then define the correct IoR value for both the inside and outside as needed. The liquid material includes the ability to define not only the IoR for the inside, but for the outside as well. This is key, since it allows light to behave as it does in reality: travel through glass, then liquid, then back through glass with no gaps or interference.
In this example, assign Glass (Solid) to your glass surface, make sure the Refraction Index is at 1.5, then move on to your next part.
For the liquid/glass surface, increase the transparency to get a lighter effect, then adjust your Refraction Index. For the inside keep it at 1.334 (liquid), but set the outside to match your glass (1.5).
For the liquid/air surface, match the Transparency, Color, and Refraction Index of our other liquid surface, and keep the Refraction Index Outside set to 1 (which is air). This will provide the correct setup, where light travels through the glass, liquid, and air correctly, without having any gaps between surfaces and overlapping surfaces.
