Creating accurate and realistic renderings can help entice stakeholders and customers buy into the vision of your product concepts. Achieving accuracy requires paying attention to the little things: small details often make the difference between flat and photo-real. Read on to learn about how you can leverage KeyShot’s opacity maps to create worn away edges for both hard and soft touch materials.
Creating Realistic Worn Edge Effects with Opacity Maps
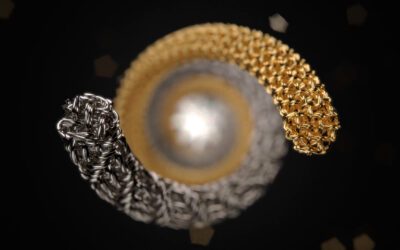
Worn edges have a variety of applications on your models: they help show wear and tear, subtle manufacturing variations, and differences between materials on products — all ways to achieve that photo-realism we’re going for.
Download Model
Before You Begin
Make sure to have your base material set up. To do this, simply edit the main material that will be covering your model to fit your needs (textures, colors, surface effects, etc). An example of this is a basic matte material with a noise texture applied to the bump input.
1. Add a Material to the Model as a Label
Depending on your model’s material, you’ll want to add a higher gloss or smoother version of your material as a label. This will essentially be the “worn” version of your base material. To add a material as a label in the Material Graph, drag-and-drop a material into the Material Graph, then select the material node’s output and drag it to the base material node’s Label input.
2. Apply a Contour or Curvature Texture
Worn edge effects can be created using Contour or Curvature textures. To create an effect where the gloss/smooth label material is visible only on the convex or positive curvature edges that receive the most wear and tear from handling, make sure that your Contour or Curvature texture is attached to your label’s Opacity input.
It’s important to note here that, in KeyShot, effects are driven by color values. For Opacity, white means the effect is entirely turned off, while black means the effect is entirely turned on. If the convex edges are white, then your label material will be visible on those edges since the opacity effect will only affect the areas that are black.
3. Adjust the Contour Settings
First, adjust the Contour texture’s color values. Start by selecting your Contour node and hit the C-key to enable Preview Color. This will allow you to get a better look at the texture itself so that adjustments are easier. To adjust your Contour settings to only show the label on positive curvature edges, start by inverting the Background and base Color. Next, adjust the Contour Width, Contour Angle, and Contour Quality until you achieve your desired black to white ratio. Once you think you’re close to the desired effect, you can toggle Color Preview off by once again hitting the C-key again. You can then dial in your effect from there.
4. Adjust the Curvature Settings
Adjusting the Curvature texture is very similar to adjusting a Contour texture. The major difference is that you have three color options to adjust. If you have gradually curving surfaces or need to create a more feathered wear effect, setting the Zero Curvature as a mid-point value can give you slightly more control of how your final effect will look.
To create the same effect as the previously mentioned Contour node, simply change the Positive Curvature to white and change the Zero Curvature and Negative Curvature to black. You can then adjust the Cutoff and Radius slider until your edges match your vision for the specific projects wear. As with Contour, you can use Preview Color (C-key) to make adjusting the Curvature node easier.
Working with opacity maps enables you to create a wide variety of effects in your KeyShot projects and increase the photo realism and believability of your KeyShot scenes. Learn more about the Material Graph and the Contour and Curvature textures in the KeyShot Manual.
What Can You Create?
We would love to see what you create with this tip. Visit the KeyShot Amazing Shots forum to see what others are creating and share your own work. And if you have a suggestion for another tip share it in the comments below.


0 Comments