
")
What is Scripting?
KeyShot Scripting allows you to automate repetitive task and build other customizations for KeyShot. KeyShot uses Python scripting, introduced with KeyShot 6.0, to provide you with more automation and reduce time-consuming processes. Automating tasks through scripts is also a great way to eliminate human error that often occurs when trying to produce consistent results.
Though KeyShot Scripting can be used in a variety of ways, today we’ll show you how it can be used to import a model, apply materials, queue several camera views and render them all out in a location of your choice. Through this, we'll show that, with a few button clicks, you can set up a process and walk away from your computer as it renders out hundreds or even thousands of material and camera combinations.
Setting Up the Scene
Our scene is a toy train - four toy trains, as a matter of fact. We want to automate the import, material application and rendering of each. This can all be done with a single script in KeyShot. Our KeyShot scene includes three parts:
- Four different 3D models
- Three different camera angles
- Two different material combinations
We'll render each model, using each material set, at each camera angle, for a total of 24 renderings, and we'll use a custom script to automate the entire process.
Download the Sample Files
There are four items needed for this script to automate the rendering of our models. Each item is included in the following download.
- The KeyShot .bip file (which contains all cameras to be rendered)
- The model or models (to be imported to the KeyShot scene and rendered)
- The material template (automatically applies KeyShot materials to the models)
- The Python script (which will tell KeyShot how to automate this process)
Overview of the Process Script
Once we have the four items above, the following steps make up the entire process. We'll follow the same five steps for any models we want to run through the same type of operation.
- Open the .bip file
- Import material templates
- Load the script
- Specify settings
- Run the script
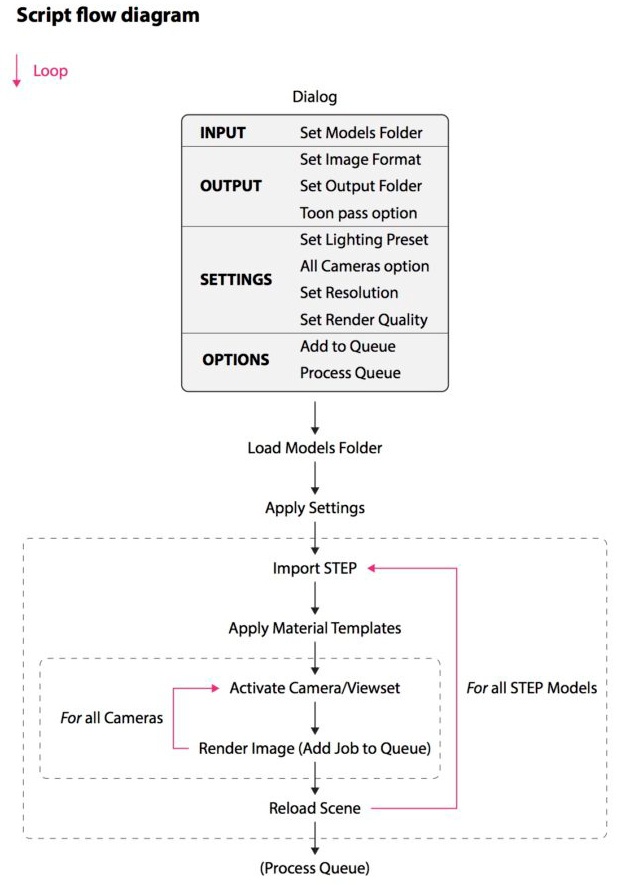
When you load the script, KeyShot will display the dialog to specify the settings for the script, then goes to work when you run it. The models will load, materials will be applied, cameras will be activated and job queued for each model we have. If we diagramed the script operation, it would look like this:
Step-By-Step
- Unzip ToyTrain.zip and open ToyTrain.bip in KeyShot.
- In KeyShot, go to Windows, Material Templates... select Import
 and load ToyTrain_Realistic.kmtp and ToyTrain_Toon.kmtp from the Materials folder.
 - In KeyShot, go to Windows, Scripting Console... or select Scripting
 on the toolbar
 - Load the ToyTrain_BatchRender.py script from the Scripts folder.
- Click Run. A dialogue box appears to specify your settings.
- Set the import location of the model files.
- Set the image file type and output location.
- Specify the render settings for the images to be rendered.
- Option 1: Check the box to render an additional Toon version.
- Option 2: Check the Process Queue checkbox to begin rendering immediately each view is added to the render queue. Do not check this box if you’d like to review the renderings in the render queue before letting KeyShot render.
Now, you can go eat, take your dog for a walk, do the laundry, or watch a movie… while your computer does all the work! Nice, huh?
Creating Your Own Scripts
This tutorial is simply one example of what can be achieved using KeyShot’s powerful Scripting capabilities. For further reading on scripting, consult our quick start guide, or visit the KeyShot Forum Scripting board.
Additional Tips
Notepad++ is a great, free text editor for Windows Users.
The Notepad++ Compare plugin is useful for comparing scripts side-by-side


