KeyShot provides plenty of tools to create realistic-looking shadows in any setting. But what about ground shadows? And how can you create a separate ground shadow with a transparent background? Read on to learn how to setup a scene to generate a ground shadow layer for ultimate control (without creating a harsh shadow pass) and, as a bonus, learn more about working with Models Sets in KeyShot.
Separate Ground Shadows in KeyShot
When you need to have greater control over your ground shadow or have it completely separate from the product rendering, this method provides a repeatable process to use across your product renderings. It’s a method that works great to dial in or have separate control over the ground shadow size, color, or adjust how it interacts with other shadows in the scene. Let’s dive in.
Download Model
1. Add a Ground Plane
The easiest way to have more control over your product shadows during post-processing is to start by isolating and rendering the shadow as an image with a transparent background. To do this, start with an empty scene in KeyShot and add a ground plane.
To add a ground plane, select the Edit menu, then Add Geometry, Add Ground Plane or or use Ctrl-G (Windows)/Cmd-G (Mac). Next, double-click the Ground Plane item in the Project window, Scene Tree to display the Material settings and change the material Type from Ground to Flat. In the Properties sub-tab, change the color to black.
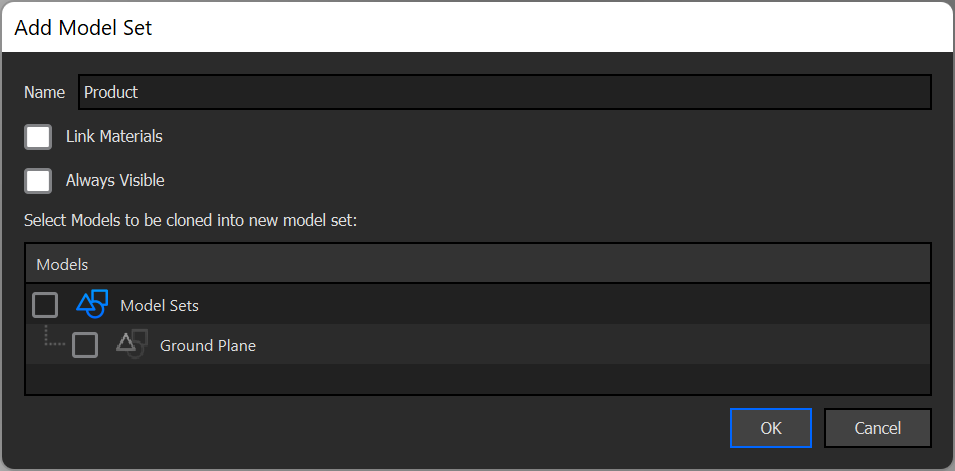
2. Organize Your Model Sets
Next, select the Textures sub-tab, click the Opacity input, and change the Texture type to Occlusion. From there, change the Opacity Map Mode to Inverse Color to blend the ground plane with its environment. At this point, the scene should appear empty, which is ideal for the ground plane Model Set. Back on the Scene tab, rename the Model Set, “Ground”, to make it easier to identify. Then, right-click the Model Sets panel and select Add Model Set. This Model Set can be named, “Product”.
Important: When you add the new Model Set, make sure that Link Materials and Always Visible are unchecked, and that Ground Plane is also unchecked. This ensures that the new Model Set does not contain a duplicate ground plane. With the new Model Set created, lock the “Ground” Model Set by clicking the padlock icon.
| Pro Tip: At this point, save the scene as a starting point for other products where you want to use the same method. |
3. Add Your Model
Make sure the “Product” Model Set is selected and drag-and-drop your model into the scene. In the video above, the model is available on the Cloud Library and will download to the Library window, Models tab. You can also import any 3D model from outside of KeyShot. Before proceeding, right-click on one of the Model Sets and select Render Thumbnails to quickly update the thumbnail images so you can easily identify the different sets.
4. Create the Independent Shadow Layer
Now you can set up the last Model Set, which will be used to create an independent shadow layer. Back in the Scene Tree, in the “Product” Model Set, select the parts that have the shadows you want to separate. Right-click the selected parts and select the Create Model Set from Selection option at the bottom of the pop-up menu. This allows you to create your last Model Set (named “Product Alpha” in the video above).
Finally, to display only the shadows, drag-and-drop the emissive white material from the Library window, Material tab onto the parts in the scene. Double-click a part with the emissive material applied to open the Material properties and uncheck Visible to Camera in the Advanced section. By unchecking Visible to Camera, the model is no longer visible, but the shadow created by the model is still present and able to be rendered out independently.
Note: if you encounter undesired shadow artifacts in your scene where your now-hidden model once was, the easy solution is to select the Project window, Lighting tab and simply increase the ray bounces (under General Lighting) and your artifacts should disappear.
You can now render out the separate Model Sets which will provide two image layers with transparent backgrounds for post-processing in any composition or against any background, without including elements of the ground plane or the model’s reflection. You can learn more about Ground Planes or Model Sets in the KeyShot Manual. If you’re interested in trying KeyShot Pro, just visit portal.keyshot.com/try/keyshot.
What Can You Create?
We would love to see what you create with this tip. Visit the KeyShot Amazing Shots forum to see what others are creating and share your own work. And if you have a suggestion for another tip share it in the comments below.


