Whether you’re trying to create weathered effects, wear marks, or fingerprints, controlling surface roughness using an image texture in KeyShot will help add a new level of realism and greater flexibility to your projects. Today, we’re going to add fingerprints to a surface using one of KeyShot’s included fingerprint textures.
Adding Fingerprints in KeyShot
Though some may question the reason for adding fingerprints to a product shot, you may be surprised at the images you’ve seen where surface dust, subtle smudges, or fingerprints have been added. There may be times when these textures are needed fora more convincing appearance for countertops, stainless steel surfaces, or other reflective, often fingerprint-attracting material. With this method, you can add any amount of smudge, smear, or fingerprint you need. Let’s take a look.
Download Model
1. Open the Material Graph and add the Fingerprint Texture
Start by opening the model, double-clicking the surface where you want the fingerprint, and click Material Graph on the Project, Materials tab. You can find a fingerprint texture in the Library window, under the Textures tab. Drag and drop the fingerprint texture into the Material Graph workspace and connect the texture to the Roughness input of the corresponding material.
2. Add a Color To Number Node
Immediately, you’ll notice that the fingerprint texture appears on the surface but if you look closely, the fingerprint appears very smooth, while the rest of the surface is slightly rougher. Since fingerprints are typically rougher than the surface, invert the effect by selecting the connector between the texture and material node, then right-click and select Utilities, Color To Number. Here’s what it looks like in the Material Graph.
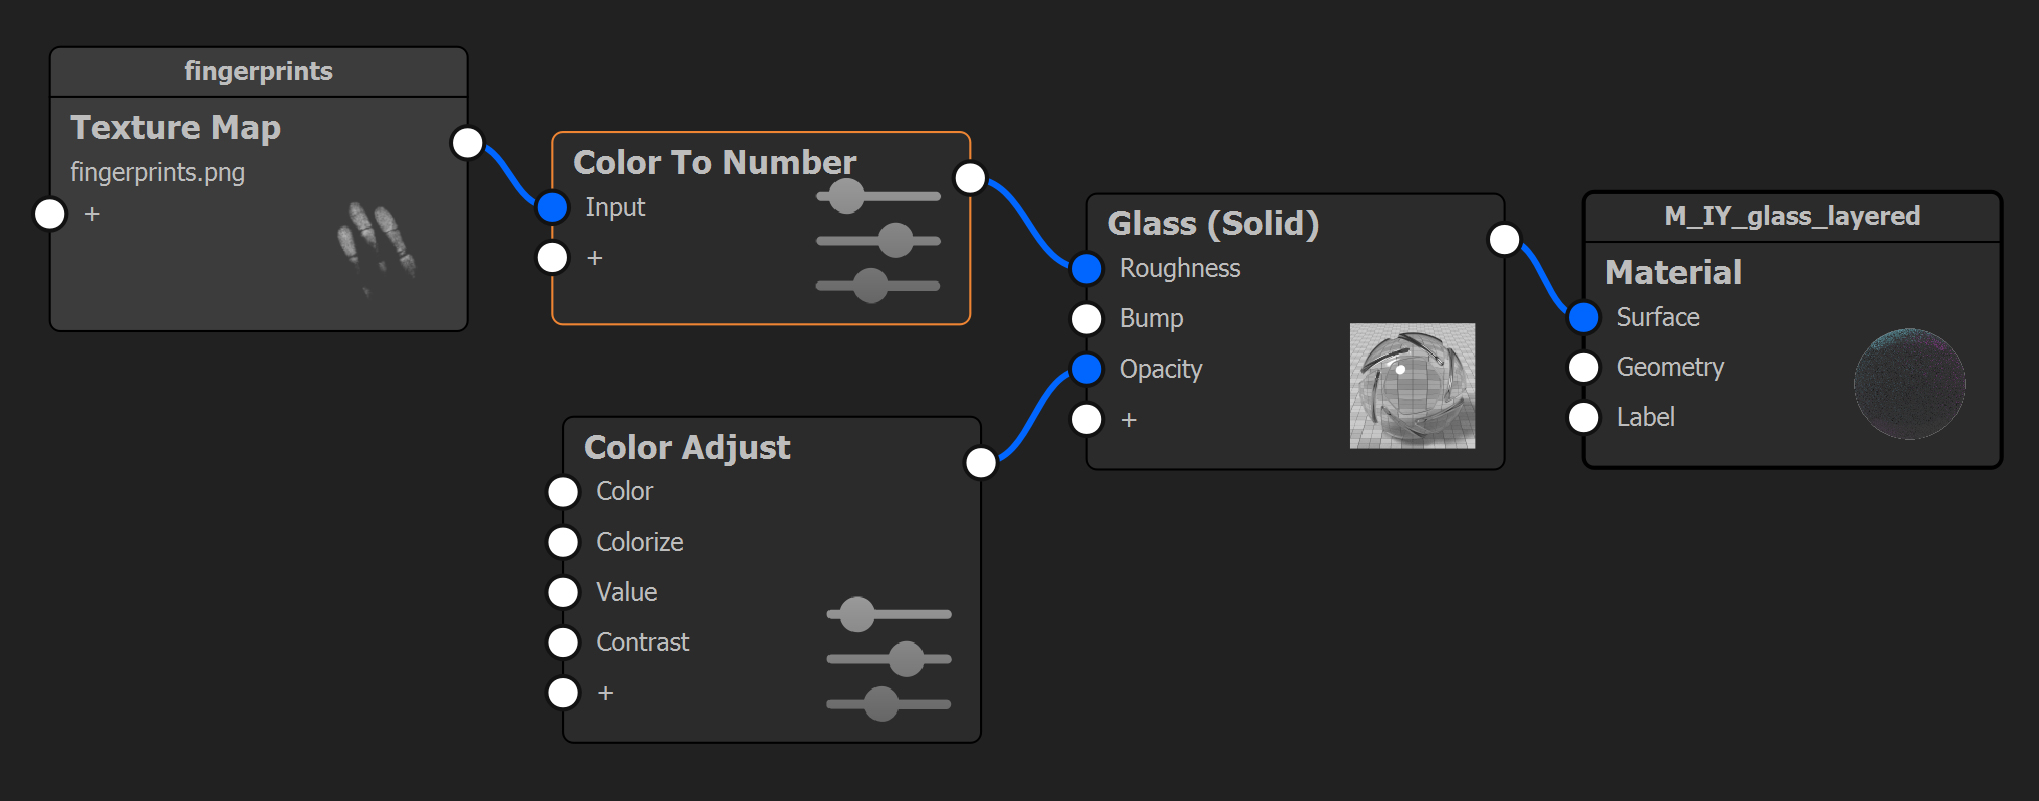
Pro Tip: Use the C-key to color preview the texture and get a better look at what you’re working with. Notice that the background appears black while the fingerprints themselves appear white or light gray. This is important since Roughness in KeyShot is controlled by color values between black and white. A pure white turns off the roughness effect while a pure black turns the roughness effect on. You will see no roughness wherever there is white. The Color To Number node allows you to reverse this.
3. Invert the Roughness
To make the fingerprints look rough, instead of the surface, double-click the Color To Number node, and invert the Output From and Output To values so that the background becomes white, and the fingerprints become gray. Then adjust the Input To value down until the fingerprints become visibly black. Exit the Color preview by hitting the C-key again and you will see that the roughness is inverted.
At this point, you can dial in the fingerprint and background roughness by adjusting the values to match your vision for the effect. Although this example specifically demonstrates how to create fingerprints using roughness, the same principles apply to any texture. Understanding how values and roughness work together in KeyShot gives you further control over any roughness effect you need.
You can learn more about the KeyShot Material Graph and the Roughness parameter in the KeyShot Manual. If you’re interested in trying KeyShot Pro, just visit portal.keyshot.com/try/keyshot.
What Can You Create?
We would love to see what you create with this tip. Visit the KeyShot Amazing Shots forum to see what others are creating and share your own work. And if you have a suggestion for another tip share it in the comments below.





0 Comments