
Herman Carlsson, started his 3D career at IKEA a long time ago. Now, as Senior 3D Artist at Spark Vision AB, he develops interior/exterior design configurators for digital showrooms. A recent personal project involved learning Marvelous Designer, optimizing the model in ZBrush, then bringing it into KeyShot to apply RealCloth materials, create the environment lighting, and produce the final renders. Here, he takes us through the process used to go from Marvelous Designer pattern to KeyShot visual.
Hoodie Design in Marvelous Designer and KeyShot
This is a basic overview of my current Marvelous Designer > ZBrush > KeyShot workflow. I will try not to go into too many technical details and, since I recently just started using Marvelous Designer (MD), I’m pretty sure I will continue to refine my workflow for every new project. First, I want to give some credits to other people who shared and helped me when I started exploring Marvelous Designer.
3d Gladiator
3D Gladiator provides an awesome, free guide and free avatar to use in Marvelous Designer. This is where I started when I decided to learn MD. I also used the free avatar when making this hoodie.
Madina Chionidi
Character Artist Madina Chionidi provides a great, free beginner’s guide that provides a step-by-step tutorial showing how to make a pair of overalls in Marvelous Designer.
Marvelous Designer
1. Source Reference Material (Refs)
First step, find good refs! Everyone will tell you, this is the key to success, and it is actually true. I admit, I often work without refs (when will I ever learn?) but my best results have always been achieved with good refs. In this case, I used my own hoodie as loose ref and inspiration. It’s great to have an actual physical object available while making models and materials. If you can find real patterns, that’s great but they can be hard to find. So, add the ref image or pattern as a Background Image to the 2D Pattern Window.

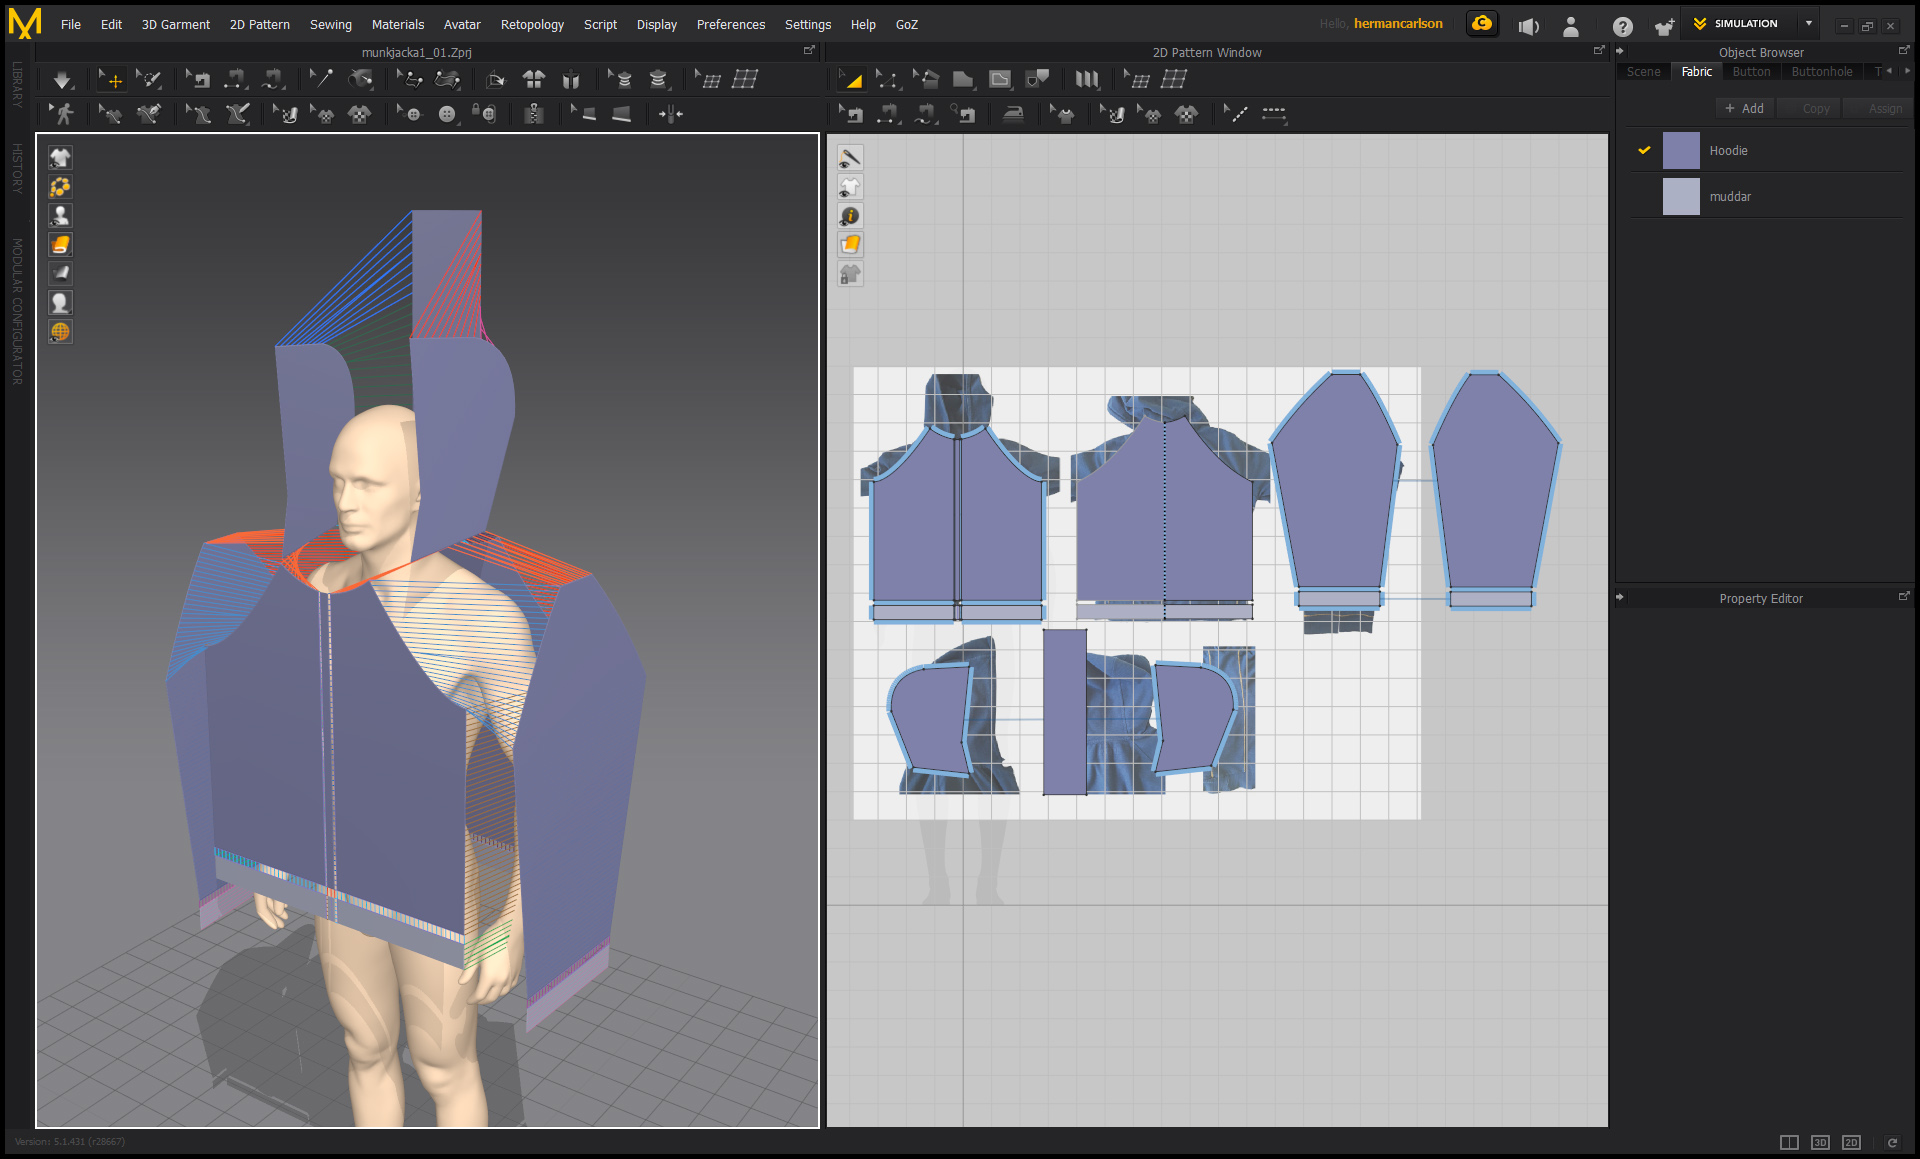
2. Create the Pattern
Create the base patterns based on the refs. Start simple and just follow the basic shapes. Position the pieces in the 3D View and sew the pieces together.
3. Set Physical Properties
Set the Physical Properties and Particle Distance (mesh resolution) and Simulate. Drag and pull the cloth while simulating to get the look you want.

4. Refine, Add Detail, and Create Final Mesh
Cut and sew to have the pieces separate as you desire then add internal lines where you need them. Use the Marvelous Designer UV Editor and check/adjust UVs when all patterns are done. Use Fold Angle/Fold Strength and Elastic features for extra control and details. At this stage, I prefer to change to Mesh Type Quad (works better than Triangles when you get into ZBrush). Simulate and don’t forget to drag and pull the cloth while simulating to get the look you want. Try different setting for Physical Properties. When you are happy with the look, set the Particle Distance for final simulation and let it simulate a while to get a nice final mesh.

5. Export to ZBrush
Export the hoodie as an OBJ or use GoZ to get it straight into ZBrush.

ZBrush
6. Import to ZBrush
This is what I get in ZBrush with Particle Distance set to 5 and Mesh Type Quad.

7. Auto Group With UV
Since the UVs are created in MD, I can use Auto Groups With UV; Polygroups are one of the most powerful things in ZBrush, use them : )

8. Sculpt, Refine, ZRemesh
Sculpt and refine the basic shapes, volumes, wrinkles and folds. Inflate brush and Smooth Directional are very useful at this stage. Subdivide then sculpt and refine again. Repeat until you get the resolution and overall look you want. More details will be added in later stages. Duplicate the subtool, delete subdivision on duplicated subtool, and split pockets to a separate subtool. Also split off pockets on the model from MD (It will make ZRemesher and Project All easier). ZRemesh the duplicate jacket with Keep Groups set to Active and Smooth Groups set to 0. Experiment with other settings to get the look you want. You do not have to ZRemesh the models, you can sculpt and work with the original Quad Mesh from MD but I prefer to work with a ZRemeshed version.

9. Subdivide and Project All
Use Crease Border then Subdivide and Project All, make sure no pockets are visible (no eye in Subtool palette). Refine and sculpt if needed. Repeat Subdivide, Project All, and sculpting until you have the resolution and look you want. Do the same thing for the pockets.

10. Add Thickness
The next step is to add the thickness, this can be done with ZModeler tools or Panel Loops (probably in many other ways as well) but will not work with a mesh that has subdivisions, so go to the highest subdivision level and Delete Lower. I used Panel Loops with 16 loops (necessary to get full reconstruction in this case), Bevel at 0, Elevation at -100, and Ignore Groups active. Now you should be able to Reconstruct Subdivs and get back to the resolution you once ZRemeshed to while keeping the high resolution. Adjust and create Polygroups for the new mesh with thickness, for the following UV step and to prepare it for splitting off pieces like the zipper part and cuffs.

11.Add Sculptural Details
Start adding sculptural details. Check out the XTractor brushes – they are great for making detailing brushes on the fly. Surface Noise is another great way to add detail, I used Surface Noise with an alpha created from mesh on the cuffs. (You can create your own alphas on the fly inside of ZBrush in many ways but that is a separate guide.)

12. Work On Clone
Merge the hoodie and the pockets and Create UVs with UV Master. With Polygroups activated press Work On Clone and then Flatten and adjust the UV islands. Copy the UVs to the hi-res hoodie and split off the parts that should have different materials. In this case, the cuffs and the zipper base. You can create the UVs after splitting if you want.

13. Prep for and Import to KeyShot
Create models for the other details like the zipper, one-stitch, laces, labels and metal parts. I used the Zmodeler brush to create low poly models ready for subdivison or Dynamic Subdiv. Create Insert Mesh brushes for stitches (Curve Mode), zipper (Curve Mode) and metal rings, and insert them on the model. I did the laces with the Curve Tube Snap brush and the labels were extracted from the hoodie. It’s good practice to always create UVs. Create Texture Maps, New From UV Map, and export them for all parts you will create unique textures for (these are also great to have as a base in Photoshop). Add textures to all parts you have made UVs for to make sure they are correct. At this stage, you can use Decimation Master if you need to reduce the polygon count before sending to KeyShot, (something I have never done for my personal projects since KeyShot is able to handle a lot of polys). Activate KeyShot as External Renderer and hit BPR. The ZBrush to KeyShot bridge will take you into KeyShot.

KeyShot
14. Lighting Setup in KeyShot
Let’s begin with changing the Lighting settings and then continue with choosing the environments then move to making the materials. Use a Custom Setting with Self Shadows and Global Illumination set. I am also using Interior Mode.

15. Apply HDRI
I usually look for environments on hdrihaven.com, a great place to find free, high quality HDRIs. For this project I chose two different environments available in KeyShot, Studio Small 03 and Studio Small 04. You can download these from the KeyShot Cloud. Select the Cloud Library icon and download these to your KeyShot Library to drag and drop into your scene.


16. Apply RealCloth
For the base material I selected RealCloth Twill Blue Flyaway Fibers from the KeyShot Material Library. Just drag and drop it on the model.

17. Adjust RealCloth Settings
Double-click on the hoodie in the Real-Time View to show the RealCloth Material Properties. Adjust the Scale and Angle for the weave size and appearance you desire. To take it further, click Material Graph (KeyShot Pro) to add a Color Composite node with a Source Alpha to control the blue/white color.

18. Adjust Label Material
The materials for the labels where created in a similar way but use the RealCloth Plain Weave material. Follow the same process using a Color Composite node with a Source Alpha for the label.

19. Adjust Other Materials
The materials for the laces, zipper base, stitches and cuffs are variations of the base hoodie material but with different Scale, Angle and/or Color, but without the Color Composite node, making them even simpler.

20. Add and Adjust Metal Material
Finally, we have the material for all the metal parts. This material is based on a default Metal material. To get some color variation, add a Curvature texture. Poliigon.com also has some great textures to add some Bump and Roughness variation if that is preferred. The Roughness value is further controlled with a Color To Number node in the Material Graph, an easy way to control your textures influence within KeyShot.

21. Adjust the Environment
Now it’s time to adjust the environment. First I am going to ruin it, then build it up again using one of my favorite features in KeyShot, the Copy Pin in the HDRI Editor (KeyShot Pro). Determine your camera angle and, in the Environment tab (using the studio small 03 environment) adjust the Size, Height, and Rotation as desired. I also switched to Photographic mode, Low Contrast option on the Image tab, adjusting the Exposure, in the end, to 0.25 EV. This is great for fine tuning the image when you’re done.

22. Use Add Copy Pin to Block Light
KeyShot HDRIs use Pins as adjustable source lighting. The HDRI Editor allows you to add and edit these. A little trick I use to block some lights in KeyShot HDRIs is to use Add Copy Pin to block existing HDRI source lights. Adjusting the Azimuth and Inclination of the pin, set the source to a suitable dark spot and locate them over the lights you would like to block. Now I have a studio with the lights turned off with a small amount of ambient light still available.

23. Add New Lights
To add some light back into the environment, use an Add Copy Pin, referencing the original small light. Now I have a movable spot I can control. Position and adjust Brightness to your liking.

24. Add Fill Light Pin
Add another Copy Pin to create another light, this time the larger one. Position and adjust Brightness for some nice fill light.

25. Add Rim Light Pin
Finally, duplicate the small light Pin, positioned and adjusted to produce some nice rim light. Once you have the look you desire, the environment is complete.

26. Duplicate with Other Environments
You can follow the same process with other environments in your Environment List. After switching environments, use the same procedure. The environment shown here has a very different look, created with using Add Copy Pin to add and adjust one additional light.

27. Render Final Images
And here are the final images, rendered with 250 samples. I hope you enjoyed this overview and that it wasn’t to detailed. I tried to keep it simple but also informative!


Herman Carlsson
Herman Carlsson is Senior 3D Artist at Spark Vision AB in Mölndal, Sweden.


