Quick Tip 53: Roughness Textures

by | Jun 22, 2016 | 0 comments

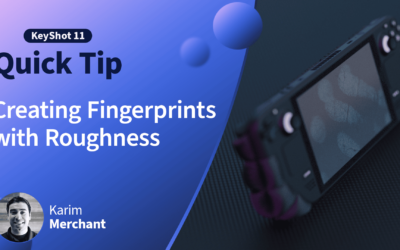
In this KeyShot Quick Tip, we look at Roughness Textures to help you add realism to your rendering, by applying a image texture to the Roughness setting on our material.

Related: The Difference Between KeyShot Roughness and Bump Textures

On certain KeyShot Material Types, you can add a texture to the Roughness setting. With a roughness texture, dark areas of an image lead to a more glossy appearance and lighter areas lead to a more matte appearance.

More quick tips here: https://www.keyshot.com/learning/quicktips/
Download and try KeyShot here: https://www.keyshot.com/try/

itunes-logo-64
Subscribe to our Quick tips on iTunes to view them where ever you are, on the go, on your iPad or at your desktop.

Try KeyShot Pro Today

Interested in trying KeyShot Pro?

Written By KeyShot

The KeyShot crew fills you in with the latest KeyShot tips and tricks, insight into 3D rendering technology and the people creating the coolest visuals across the engineering, product design and entertainment industries.

Categories

Recent Posts

The Winners of the 2024 KeyShot Animation Challenge

The Winners of the 2024 KeyShot Animation Challenge

Talk about bringing your renderings to life! Our first design challenge of 2024 was all about making your renderings move with KeyShot’s animation features like Physics Simulation and Camera Keyframes. Our judges were delighted by the hundreds of submissions to this contest, and they narrowed it down to the top three winners plus an honorable mention.

KeyShot vs Blender: Which One is Best?

KeyShot vs Blender: Which One is Best?

Explore how render farms enhance rendering workflows, offering insights into types, workings, and the integration of KeyShot for optimal efficiency.

Find Us on Facebook

Archive

YOU MIGHT ALSO LIKE

COMMENTS

0 Comments

Submit a Comment

Your email address will not be published. Required fields are marked *