KeyShot 11 introduces the new 3D Paint feature that allows you to very easily paint and stamp textures on the surface of your 3D models. Today, we’ll break down the capabilities 3D Paint provides to control the effects through the Brush Shape and the Brush Color.
3D Paint in KeyShot
3D Paint is a KeyShot texture tool that allows you to apply textures with an adjustable brush or stamp. You can use this tool to paint weathered appearances, layer textures, apply smudges, add score marks, and much more. There’s a new demo scene in KeyShot you can use for reference. After you download and install KeyShot, click the 3DPaint_Barrel scene in the Demo Scene tab of the KeyShot Welcome Window. Ok, let’s get into it.
Where is 3D Paint in KeyShot?
3D Paint is applied as a texture. In fact, it’s a node in the KeyShot Pro Material Graph material editor that can be applied to other nodes! To use 3D Paint, double-click a surface on your model. This will open the Project, Material tab. In that window, select the Textures sub-tab, then select 3D Paint from the Texture dropdown.
3D Paint – Brush Shape
With your 3D Paint texture set, you’ll see the settings with options to change both the Brush Color and Brush Shape. There are a few methods you can leverage both options to create unique and customizable effects when painting objects in your scenes.
Changing the Brush Shape
By default, the Brush Shape is round, which is useful for many applications but for unique surface effects or custom branding, you’ll want to change the Brush Shape by using an image. For a custom Brush Shape, we recommend using images that are textural (like scratches or splatters) and have a transparent background (which can be set for .png and .tif image formats).
Using a Logo as a Brush Shape
For applications where custom branding is desired, import your logo or logo type as a transparent .png as a Brush Shape and adjust the brush Size and Opacity to fit your needs. You can use your logo as a brush, however, if the goal is to place a single brand mark, the best option is to select Stamp (next to the Brush preview window) to only place one instance of the shape. With Stamp selected, a logo can be placed wherever needed, adjusting Brush Color to adjust the logo color. An added benefit of stamping logos rather than adding them as labels is that you can directly paint on or erase your markings to create weathering effects without having to use texture maps to drive them.
Using the Material Graph to Control Brush Shape
Another way to create unique branding marks with 3D Paint is to use a 3D Paint node to drive the Opacity of a Label material. If you use a brush to create logos through your parent materials surface input, you’re limited to the material that your 3D Paint node is connected to. However, if you want your branding marks to be a different material, the best method is to apply a label that matches the material you want for your branding mark, then attach a 3D Paint texture to the labels opacity input. You would then change your brush shape input the same way we did in the previous example.
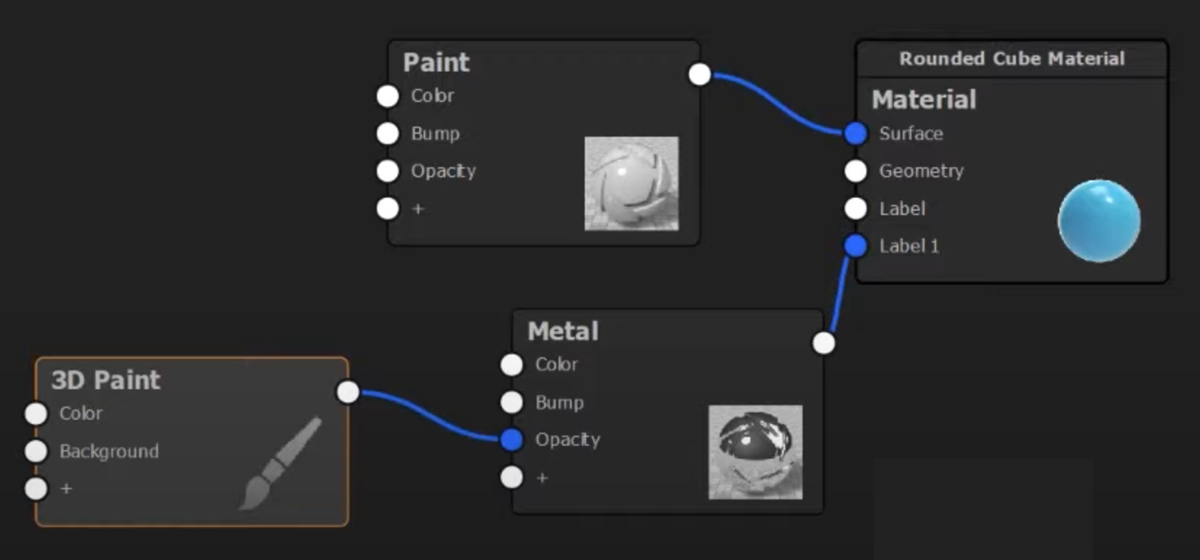
This now allows you to give your branding marks the characteristics of your chosen label material and you’ll also be able to change the material’s color directly from that label’s material settings. This gives you a little more flexibility in regard to logo material compared to the previous example.
3D Paint – Brush Color
Now that we have an understanding of Brush Shape, let’s take a quick look at Brush Color. If you watched our 3D Paint overview, you’ll likely be familiar with this. There are essentially three methods to work with Brush Color when using 3D Paint.
Pick a Brush Color
The first method to set the color of a brush is to simply click on the Brush Color color selector and select a custom color in the Color Picker window the same way you would when changing any brush shapes color. This is the easiest and most direct way to select a color for your brush.
Drive Brush Color with a Texture
The second method is to select an image texture to drive the color by clicking the texture input next to the color selector. By using an image to drive the color, the brush uses the color in the image apply many instances of the same image as you move the brush along the surface. The number of instances will be entirely dependent on the brush’s flow rate and spacing. This can be really useful when you’re trying to create custom gradient brushes, or you have other unique effects in mind.
Fine Tune Brush Color via Material Graph
The third method is to apply an image textures through the Material Graph in KeyShot Pro. This gives you the greatest control. You can then drag and drop an image texture into the Material Graph Work Area and attach the newly added texture to the 3D Paint node Color input. This allows you to adjust the image texture to a desired scale, and paint a 1:1 representation of the image texture.
There’s a lot more to 3D Paint, so be sure to check out the 3D Paint Tutorial. You can learn more about 3D Paint and the Material Graph in the KeyShot Manual. If you’re interested in trying KeyShot Pro, just visit portal.keyshot.com/try/keyshot.
What Can You Create?
We would love to see what you create with this tip. Visit the KeyShot Amazing Shots forum to see what others are creating and share your own work. And if you have a suggestion for another tip share it in the comments below.