In this Quick Tip, you’ll learn how to make embossed and debossed logos on any geometry within KeyShot 6. Modeling a logo into a piece of geometry can be a time-consuming process. KeyShot speeds up your workflow by allowing you to use graphics to create convincing embossed or debossed logos.

To create the embossed or debossed effect, you’ll want to start with a white version of your logo on a transparent background saved to .png format. To soften the edge of the bump, apply a slight gaussian blur to the logo before using it in KeyShot as shown above.

Begin by viewing the surface you wish to place your logo on, For best results the camera lens should be parallel to the surface you want your logo to be placed. The ‘standard camera view’ (found under the camera tab) can help to achieve this. Next, in the project panel, under the materials tab, click the Labels sub-tab and click the add label button and select the desired logo from your computer’s hard drive.

In the real-time window, click where you want to place the center of the logo, then scale it down to fit the surface. If both your model and logo are made to scale, you can scroll down and input a DPI value instead of using the scale slider (not shown in this example). In this case, the Normal Projection mapping type was used. You may notice clipping if using Normal Projection on a curved surface. If so, increase the depth until no more clipping occurs. At this time, you may wish to uncheck the ‘Two Sided’ box. Use the Shift X and Y sliders as needed to finalize the placement of the logo.
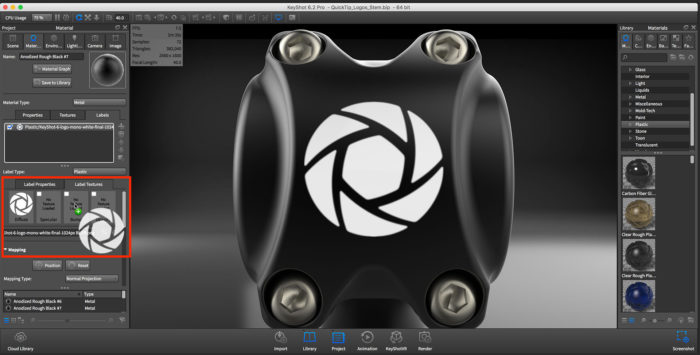
To achieved an embossed or debossed look, simply drag your logo from the Diffuse Node to the Bump Node. To retain the diffuse texture, duplicate your graphic by holding alt while dragging from the Diffuse Node to the Bump Node.

In KeyShot 6, materials can be assigned to labels, which is you’ve applied the logo as a label. Changing the material type will allow for greater control over the texture or surface finish of a logo. In this example, the material type was changed from the default of plastic to metal, and since the diffuse color was white (driven by the white logo in the Diffuse Node), the logo appears to be 100% reflective, just like a chrome surface.

With the Bump sub-tab enabled, use the Bump height slider to control how heavily the logo will appear to be embossed. Input a negative value to achieve a debossed look.

To complete this look, the original white logo on the Diffuse Node was replaced with a Black one to give it a glossy, black appearance rather than a chrome, mirror finish. Replace any graphic by double-clicking on its representation node in the Material Tab as shown above.


0 Comments