This week, Concept Artist, Marc J. Goliszek, made a special guest appearance as Keynote speaker at the INNEO Solutions KeyShot World event, speaking on the process he uses to create the amazing visuals you can view in his portfolio. Using ZBrush, 3ds Max, Photoshop and KeyShot, Mark creates character concepts and product visuals that are truly eye catching. During his presentation he provided a breakdown of the model-to-composite process he uses, along with a step-by-step workflow inside KeyShot.
Marc J. Goliszek
Modeling software used: ZBrush and 3ds Max
Website: darkpixel.us
In my presentation, I explained my typical workflow and opted to showcase KeyShot’s remarkable versatility, strength, speed and quality for 3D renders, visualizations and illustrations for the entertainment industry (concept art, hard-surface, character art) as well as science (medicine and biology to name a few). The following is an excerpt of the projects which were presented during the conference, with brief explanations for each project.
Science, Medicine & Biology
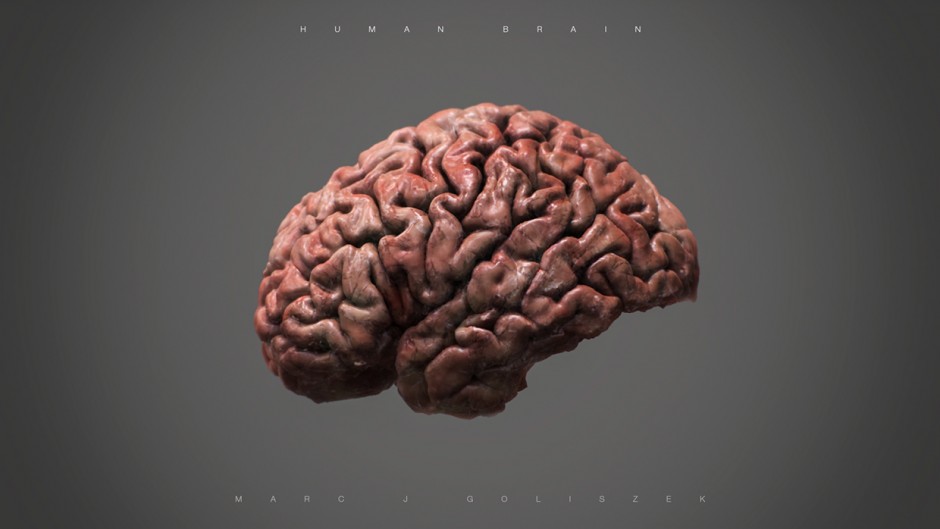
I have recently begun to explore doing professional render work for the scientific field, including biology and medicine to name a few. This brain (left hemisphere) was rendered in KeyShot using multiple passes as seen below.
Human Brain render breakdown
I rendered 4 individual render passes (+ clown pass) which I later composited in Photoshop to achieve the above seen final result. Using unconventional materials to achieve entirely unique ones, is one of the key strengths which KeyShot brings with it. The rubber pass was used to even out the highlights and improve contrast + tonality, whereas the glas material served as a render to create the blood vessels.
Red Blood Cell
The same procedure as shown with the human brain illustration. I also used the exact same materials as shown in the render breakdown of the brain to achieve this final result. The only difference being a different compositing and editing process in Photoshop.
Underwater Creature Concept
Here I wanted to show KeyShot’s ability to bring creatures and concepts to life using materials which aren’t really meant for it. Here I played a lot with KeyShots embedded Skin Shader with a high translucency and increased specularity to achieve the effect of a wet, fleshy, soft skin surface. The “armor” of the creature was achieved using concrete, asphalt and 3 Axalta car paint materials. I also used Dosch Designs amazing underwater HDRI to achieve this photorealistic camera shot.
Underwater Creature Concept
The same creature, non-processed, direct base render out of KeyShot which served as a secondary material for the composition.
Alien Character Concept
From the underwater world up high into space: aliens also have a home in KeyShot. Hereby I simulated a studio lighting setup by creating a custom HDRI light setup using HDR Light Studio in KeyShot. Using the ZBrush to KeyShot bridge I transferred all texture and painting information directly over to KeyShot with absolute ease and in no time at all. Using light post-processing and compositing in Photoshop, this character was born.
My Workflow / KeyShot Tank – Step 1 (Model Import)
During my presentation I explained my typical KeyShot workflow, step-by-step using this 3D tank which I got from badking.com.au. It was small enough to give the audience an easy to grasp overview, yet detailed enough to make it interesting to follow.
KeyShot Tank – Step 2 (Camera Setup)
Here I showed the importance of spending more time during the camera and shot setup. The reason this step is so important to get done right in the beginning, is that it serves as a foundation for the upcoming light and material setup; hence enabling me to imagine the final outcome much better, instead of unnecessarily fiddling around afterwards.
KeyShot Tank – Step 3 (HDRI / Light Setup)
Here’s where I spend a good amount of time setting up the right lighting for my concepts or illustrations. I ask myself questions on whether I want the composition to be dramatic, dynamic, evenly lit and a lot of other options that might work in conveying the essence and the character of the model. This is where a lot of experimenting begins. At this stage I often give the model a black shiny plastic material as it allows me to better understand how the light illuminates the model with the previously selected camera and, very importantly, how the highlights fall on the model.
KeyShot Tank – Step 4 (Material Selection)
This is my absolute favorite part as you can really see the model coming to life. In my workflow I often give the model one individual material that I believe is going to work for the bigger picture in the end. This is a cross-section of the 5-6 materials which I added to KeyShot’s render queue and rendered using the maximum time option (which is a fantastic solution to have KeyShot decide for itself how to calculate the best quality with a pre-determined time).
KeyShot Tank – Final Render & Variations
All of the previously shown render passes have now been composited and blended in Photoshop CC to achieve this final result. I like using this workflow as it gives me incredible flexibility in using and adjusting the materials as I please and therefore helps create a multitude of variations in the shortest amount of time without being fixated on one idea.
KeyShot Tank – Final Render V2 (Used Version)
This is an example of how quickly I can add a used and damaged look to the concept by using the exact same material render in addition to masking and overlay modes in Photoshop.
KeyShot Tank – Final Render V1 Alternative (Different Color)
Same principle as before. By using the same materials to achieve new variations quickly and efficiently without having to go back to KeyShot to render additional passes. I highly recommend doing at least one bright color render (either R, G or B) in the primary material for your model. Having a bright material render serves a very flexible method to change it using Hue/Saturation for example, in Photoshop.
KeyShot Tank – Final Render V2 (German Tank Version)
The exact same procedure in blending the various KeyShot render passes together to achieve this camo military pattern tank.
Hard Surface Character Concept – NASA X-977
Showcasing KeyShot’s ability to realistically render non-existing things and making concepts believable. This is a 100% KeyShot render in which I added various materials such as glass, chrome, plastic, metal and carbon fiber. Most decals were projected in KeyShot using the label projection.
Character Concept using KeyShot as a compositing tool for concept illustrations
Here I directly imported the helmet using KeyShot and matched it with the background photo using KeyShot’s perspective matching option. Once done, I experimented with a number of HDRI maps to match the lighting with the backplate in order to achieve a dramatic composition.
Character Concept using KeyShot as a compositing tool for concept illustrations
A big thanks to Marc for an excellent Keynote address and look into his process. To view more of his work or contact him, please visit his website at darkpixel.us.


