Oliver Yu is an avid gamer with a love for photography, lighting, and 3D visualization. He works for PDP, a video game accessories manufacturer, where he designs and creates image and video assets for video game controllers, cases, and headsets for Sony Playstation, Microsoft Xbox, and Nintendo Switch. Originally a professional photographer, Oliver now does 3D visualization full-time, and he loves the photo-real capabilities provided in KeyShot.

Oliver Yu
LinkedIn | Instagram
Modeling software used: Blender, SOLIDWORKS
How did you get started creating 3D visuals and how did you learn KeyShot?
My journey into the 3D space was done out of necessity during a corporate restructuring of PDP, as I was originally a staff photographer and videographer for the company. Because my team was scaled down due to various reasons, in order to continue to put out consistently high-quality work, I needed to learn KeyShot on the fly. I ended up spending an entire month during the corporate transition to learn KeyShot and I quickly grasped the basics on how to get high quality renders for syndication.
Having been a professional commercial photographer for over a decade, the 3D environment was something I always saw to be the future, but the learning curve to most 3D tools out there were always daunting. I was forced to move to a full 3D workflow to harness more efficiency than the archaic process of manufacturing hundreds of samples and then photographing all of them, only to have a handful that actually move forward to production. With KeyShot, all of this can be done digitally before a single sample has ever been made, allowing all the stakeholders to have a photorealistic visual of the products, ultimately saving hundreds of thousands of dollars annually in sampling costs and providing assets to get data driven business decisions.

What are some of your favorite projects?
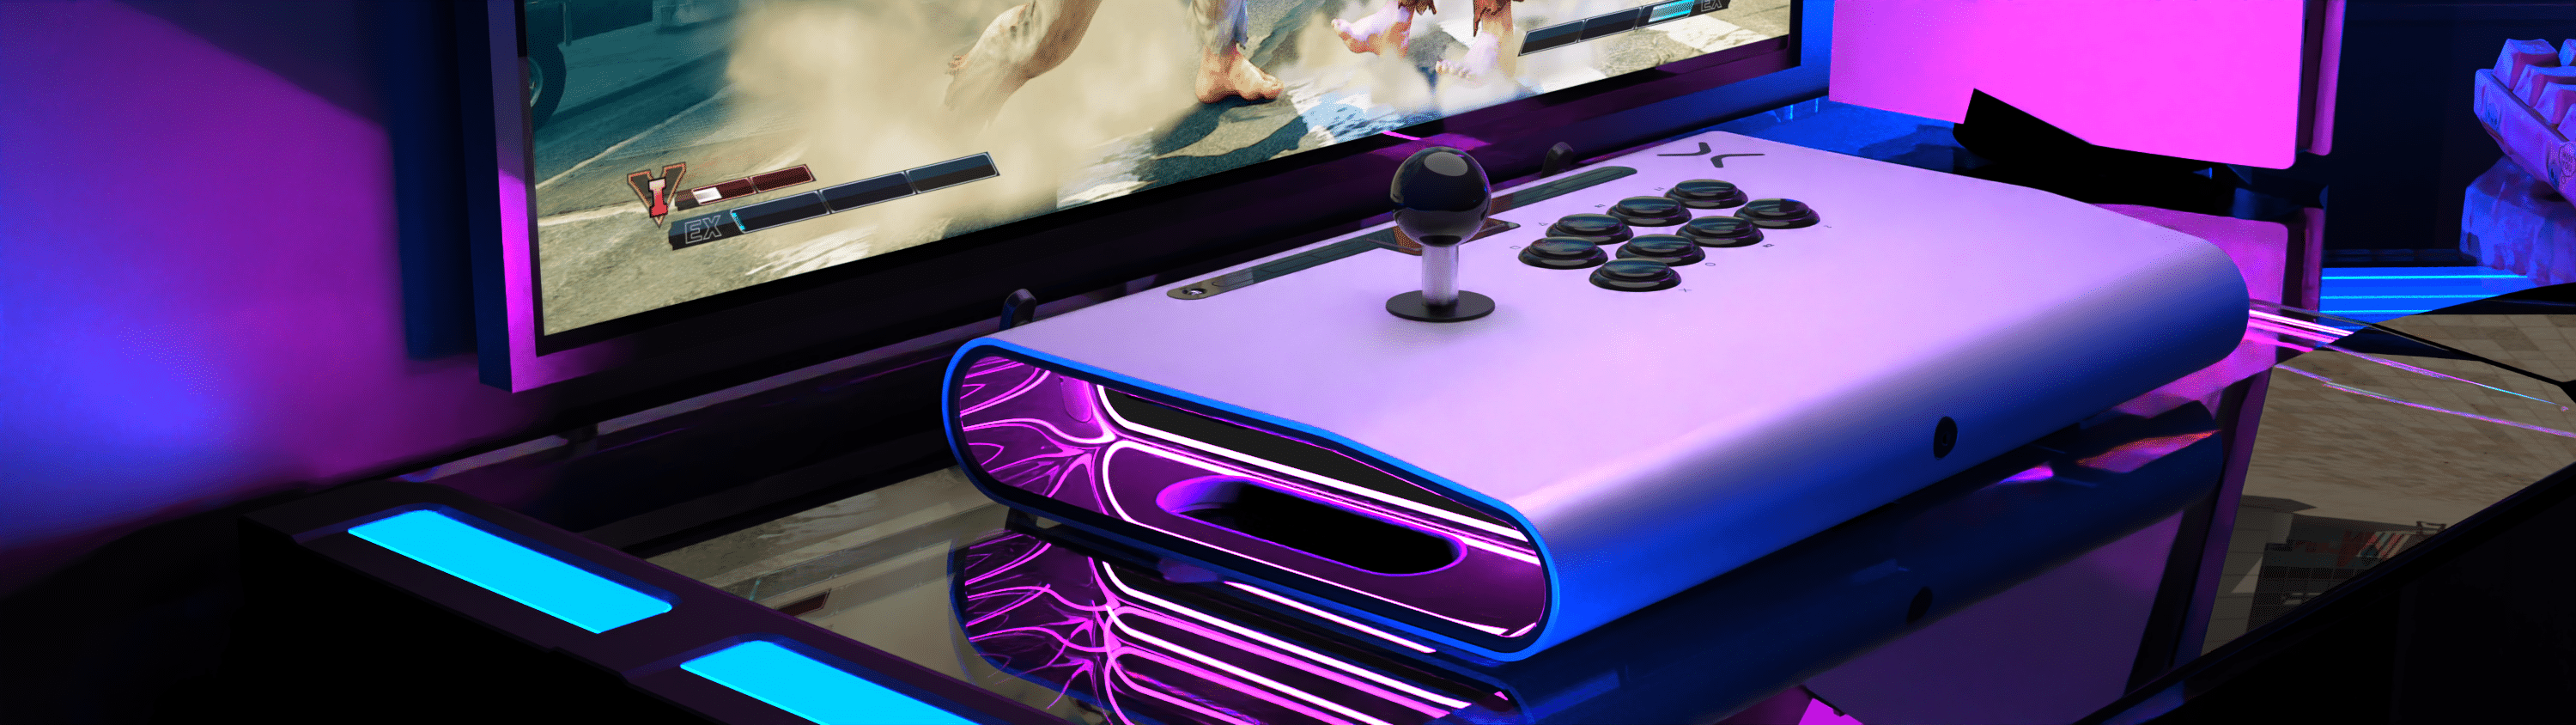
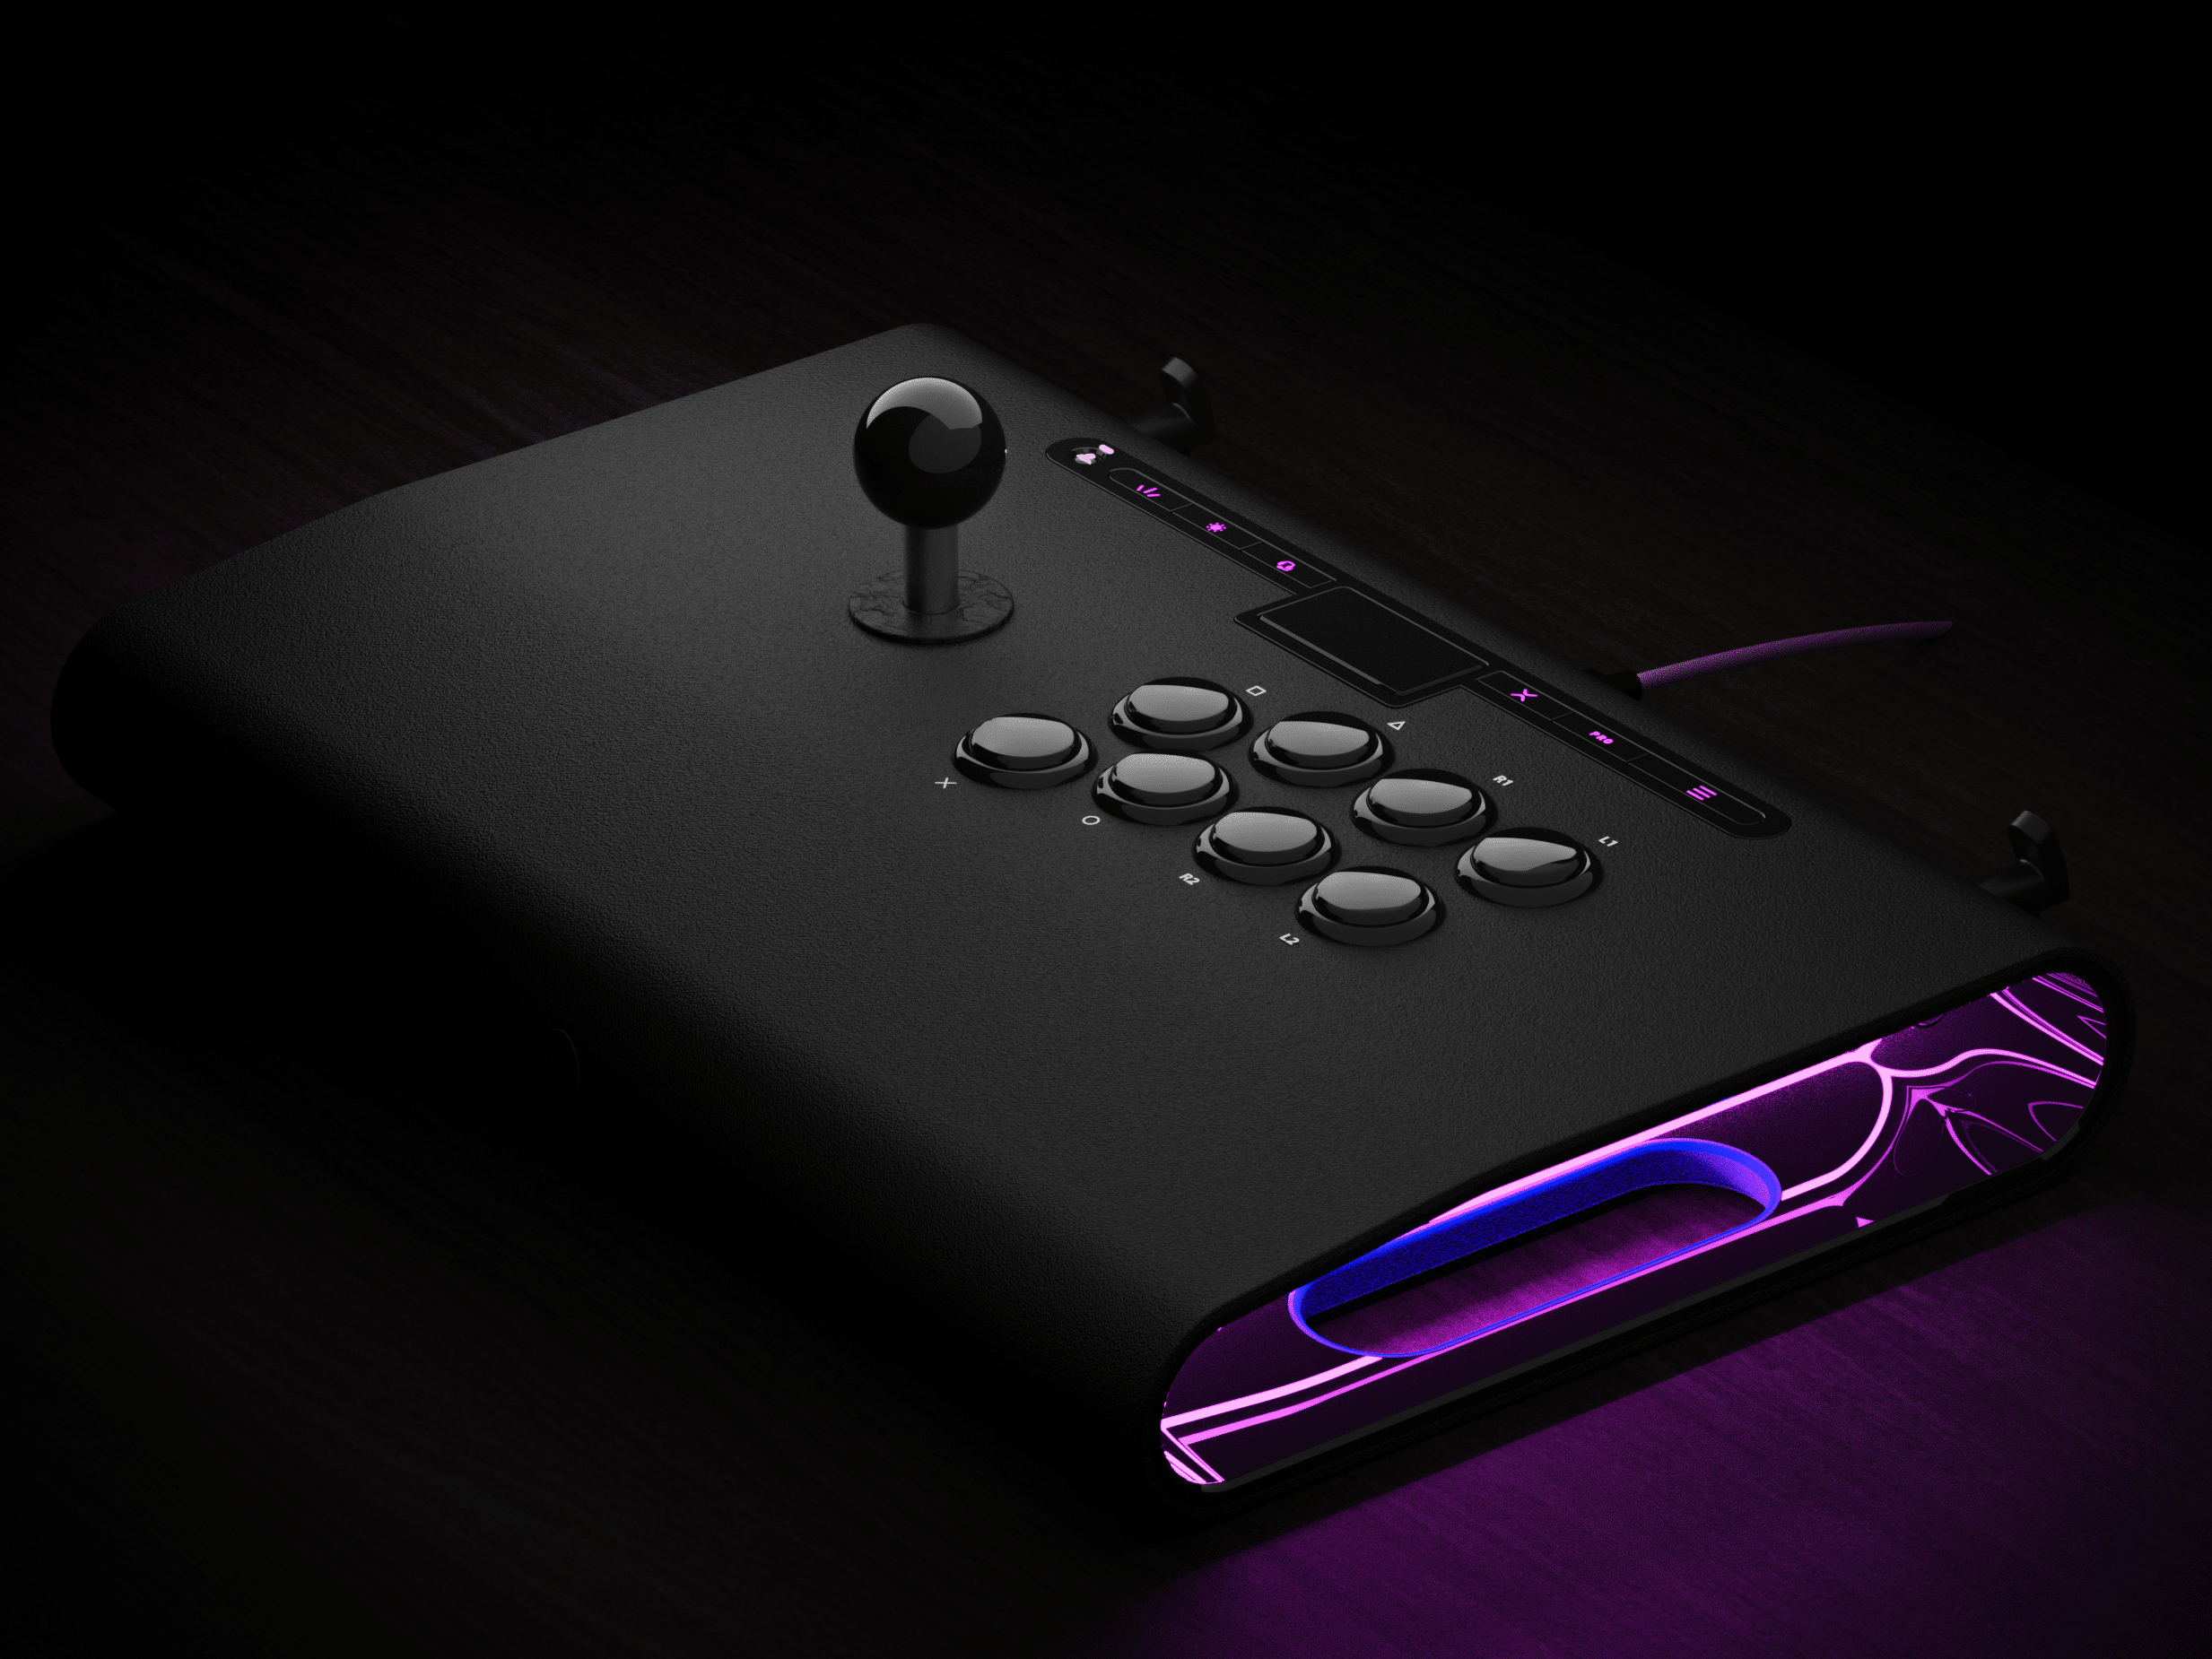
My favorite project that I have worked on so far is the Victrix Pro BFG, a professional eSports gaming controller designed for competitors in the fighting and shooting game circuits. The controller features the ability to customize the controller in an unprecedent manner by being able to swap modules that change the orientation, configurations and even the buttons. Every decal, pad print, texturing, switch and light were all things I had to implement using KeyShot. Also, with so many parts and accessories included, having the ability to control every part inside a 3D space really allowed me to do things I could never do before with photography. The controller is currently one of the most successful pro eSports controllers on the market and having such a large contribution to the aesthetics of the controller brings me a lot of satisfaction, that talented players are using these controllers to win tournaments and achieve feats never done before in professional gaming history.
How would you describe your design philosophy?
Unlike many other designers, I design the 3D model in Keyshot. Most designers generally take a 2D art design and then implement their designs onto a 3D model. I personally find it hard to visualize a cohesive design in this manner, where when I design directly in Keyshot, I feel I can more accurately place design elements and details on the controller, cases, and headsets. This allows me to see my design take form on the actual accessories, which gives me more inspiration to try new things, like different materials, graphics, and accent lighting, which leads to new and innovative designs that no other company had done before. The flexibility KeyShot has in materials and labels allows me to bring forth great concepts that need no words to describe, as the visuals sell themselves. If “a picture paints a thousand words” a rendering in KeyShot generates many more with the number of camera angles and lighting configurations one can generate in several minutes.
Where in your process do you use KeyShot?
We're using KeyShot throughout the entire design process. After basic shapes of video game accessories are made in CAD like Blender or SolidWorks, these basic geometries are taken into KeyShot to play with materials, art designs, texturing, color and lighting. Sometimes even duplicating model surface layers and creating transparent layers to create dynamic parallax 3D effects with stacked art of different textures can lead to novel design ideas.
We then take a few different design concepts and place them through surveying where we get more information on the direction our designs should go, using solid data from our target demographic. After getting the results, we then refine the concepts to better tailor to the current market trends and move forward to pitch statically proven designs to our retail partners.
From there, we begin to create tech packs and CMF spec sheets for our factories overseas, where we provide 3D renders of the product we like to produce. The factories will then make several rounds of samples till we get the actual product looking the best it possibly could, then we modify our original renderings to reflect the actual physical product. As mass production ramps up, we have image assets all prepared for packaging, ecom, and marketing ready for distribution as our 3D models are all prepped before a single product is made off the mass production line.

What are some of your favorite KeyShot tools?
My favorite KeyShot tool is definitely the Material Graph. The materials, tools and settings are amazing on their own, but you can then combine them in the Material Graph to get novel results that make the massive library of features exponentially larger. For example, you can use the Fuzz Geometry tool to create realistic fuzz material, but make the fuzz longer and straighter then combine it with the 2D procedural mesh tool, and then you’ve got yourself bristles on a brush or comb. You can take the Contour node and tie it to an emissive texture to create a Tron-like outlining effect on your products or take that same contour tool and combine it with glass material to make a glass object with solid edge details. One of the most fun aspects of KeyShot is taking these nodes and trying out a bunch of different combinations to create effects that even the developers hadn’t thought about using together.

Where do you find your inspiration?
I probably get most of my inspiration from video games and anime. I’ve been a gamer for 31 years and I’ve had many dreams of products and designs that I wish were a reality. It is certainly a dream come true to finally realize many of these designs I have thought of over the years. Being a photographer for most of my professional life, I only could photograph and composite together images to create ideas and concepts, but that was always very limiting. Now I feel the world is at my fingertips and I can create the super cool things that I know the gaming community have been waiting for, and if nothing else, I can create renders and art for myself to admire. Even though work is a Monday to Friday activity, that certainly isn’t where my KeyShot exploration ends, as I am always playing around with different aspects every free opportunity I get, as even at 1am in the morning, I am always trying to push out one more rendering.
What advice would you give to photographers who are considering going into 3D visualization?
I was first always rather afraid to approach the 3D space as I’ve done what most people that try to dip their feet into 3D with the donut Blender tutorial. After completing that video course on YouTube, one often feels overwhelmed at the sheer number of settings, terminology, and new skill sets required to create a successful rendering. Having a photography background, the tools, settings and UI of KeyShot all just made sense to me. Focal lengths, lens apertures, lights being measured in watts and lumens were all terminology and tools I used to construct my art my entire career and these things were all translated into the 3D environment in KeyShot, making the learning curve significantly more palatable.
Another aspect I was afraid of is all these skills I have developed over the years in photography becoming obsolete and worthless, but in reality, having these skills can fast track your 3D journey to creating amazing 3D renderings. The hardest part of 3D rendering is trying to make them look realistic and the best way to make things look realistic is lighting and textures. Just as any commercial studio photograph you are going to take of a product, the same knowledge applies to setting up a lighting scene for your 3D renderings. You need your large light sources for soft light, small light sources for hard light, scrims, flags, and light shapes for artistic lighting design, different colored gel lights for accents, longer focal lengths for more compression and wider angles for fisheye effects, depth of field, etc. All these things and more are all applied when making great 3D renderings, which is a lot more difficult to learn than the technical tools and settings in KeyShot – which you already have in the bag.
Probably the most advantageous aspect of Keyshot is that you take out all the budgetary limitations you have in actual photography. Have you ever felt you just need one more light, softbox, modifier, focal length, etc? You can add as many lights in the full RGB spectrum of color, in whatever focal length, shooting at any aperture, with as much depth as your heart desires. 500mm at F/1.4 but with just enough depth to ensure your product is sharp – No problem! You want to do a complicated 10-light setup where you are placing accent lights inside your product at strange angles and in places where it would be difficult to fit a light? Easy. You want to throw a giant sun right in front of your product right in your shooting line? Do it and just make the light invisible to the camera. One of your lights casting an annoying reflecting and blowing out your shadows? Make it so the light doesn’t appear in reflections and shadows. You can create the images you envisioned while not having to buy another $3000 camera lens or get another $2000 Broncolor studio strobe to get that picture perfect image.